스레드 생성과 실행
스레드 생성과 실행
스레드의 생성
기본적인 생성 및 실행 방법
1
2
3
4
5
6
7
public class HelloThread extends Thread {

  @Override
  public void run() {
    System.out.println(Thread.currentThread().getName());
  }
}
1
2
3
4
5
6
7
8
9
10
11
12
public class HelloThreadMain {

  public static void main(String[] args) {

    System.out.println(Thread.currentThread().getName() + " start");

    HelloThread thread = new HelloThread();
    thread.start();

    System.out.println(Thread.currentThread().getName() + " end");
  }
}
스레드 생성 시 일어나는 일
- 스레드를 생성하면 새로운 스택 생성
- 메서드를 실행하면 스택 위에 스택 프레임이 쌓임
main스레드는main()메서드의, 스택 프레임을 스택에 올리면서 시작- 직접 만든 스레드는
run()메서드의 스택 프레임을 스택에 올리면서 시작
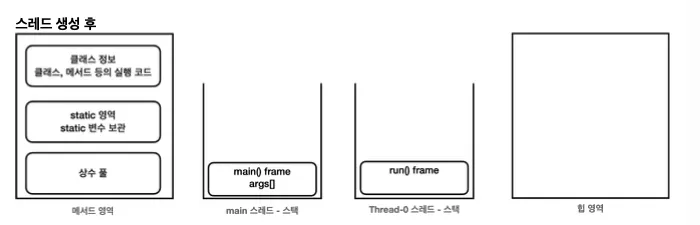
스레드 간 실행 순서는 보장하지 않습니다.
💡
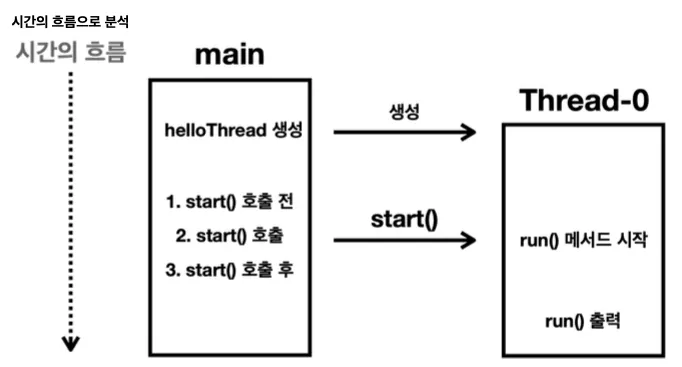
run()vsstart()
run()메서드는 스레드를 생성하는 것이 아닌 그냥 메서드를 호출하는 것입니다. 따라서 스레드를 생성하고 싶다면 반드시start()메서드를 실행해야 합니다.
Runnable 인터페이스를 구현하여 생성
1
2
3
4
5
6
7
public class HelloRunnable implements Runnable {

  @Override
  public void run() {
    System.out.println(Thread.currentThread().getName());
  }
}
1
2
3
4
5
6
7
8
9
10
11
12
public class HelloRunnableMain {

  public static void main(String[] args) {
    System.out.println(Thread.currentThread().getName() + " start");

    HelloRunnable runnable = new HelloRunnable();
    Thread thread = new Thread(runnable);
    thread.start();

    System.out.println(Thread.currentThread().getName() + " end");
  }
}
람다를 사용하여 간단하게 작성
1
2
3
4
5
6
7
8
9
10
11
12
public class InnerRunnableMainV4 {

  public static void main(String[] args) {

    log("main() start");

    Thread thread = new Thread(() -> log("run"));
    thread.start();

    log("main() end");
  }
}
Thread 상속과 Runnable 인터페이스 차이
Thread 상속
- 장점: 간단한 구현
- 단점: 상속의 제한
Runnable 인터페이스 구현
- 장점
- 상속의 자유로움
- 코드의 분리: 스레드와 실행할 작업을 분리하여 코드의 가독성을 높일 수 있음
- 여러 스레드가 동일한
Runnable객체를 공유 가능
- 단점: 코드가 조금 더 복잡해질 수 있음
결론은
Runnable인터페이스를 구현하는 방식을 사용하면 됩니다.
- 스레드와 실행할 작업을 명확히 분리
- 인터페이스 사용
즉, 더 유연하고 유지보수 하기 좋은 코드를 만들 수 있습니다.
데몬 스레드
스레드의 2가지 종류
- 사용자(user) 스레드
- 프로그램의 주요 작업을 수행
- 작업이 완료될 때까지 실행
- 모든 user 스레드가 종료되면 JVM도 종료
- 데몬(daemon) 스레드
- 백그라운드에서 보조적인 작업을 수행
- 모든 user 스레드가 종료되면 JVM은 데몬 스레드를 기다리지 않고 프로그램 종료
참고
이 기사는 저작권자의 CC BY 4.0 라이센스를 따릅니다.