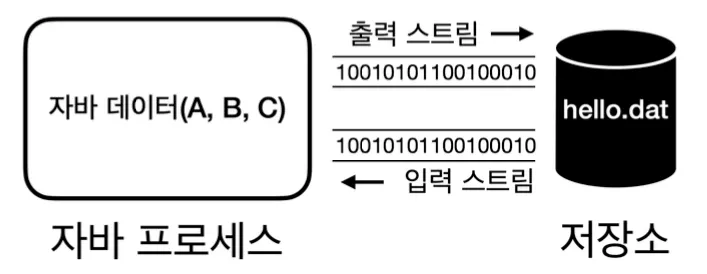
I/O 기본
스트림
- 출력 스트림: 자바 프로세스가 가지고 있는 데이터를 밖으로 내보내는 것
- 입력 스트림: 외부 데이터를 자바 프로세스 안으로 가져오는 것
byte 다루기
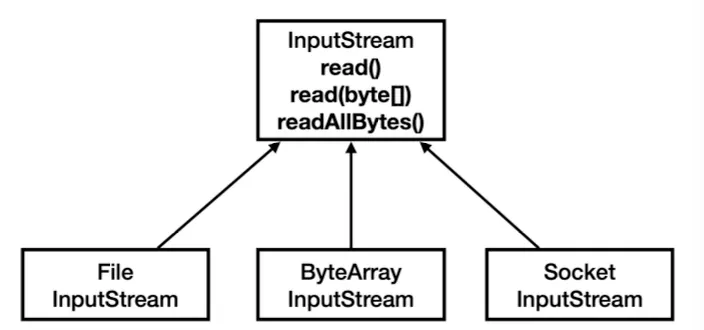
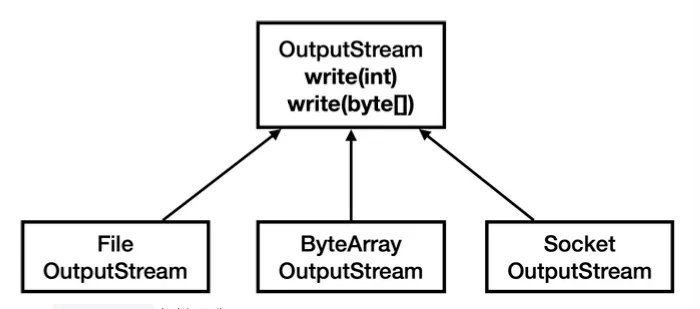
InputStream/OutputStream
- 일관성: 모든 종류의 입출력 작업에 대해 동일한 인터페이스를 사용할 수 있어 코드의 일관성 유지
- 유연성: 실제 데이터 소스나 목적지가 무엇인지 관계없이 동일한 방식으로 코드를 작성
- 확장성: 새로운 유형의 입출력 스트림을 쉽게 추가할 수 있음
- 재사용성: 다양한 스트림 클래스들을 조합하여 복잡한 입출력 작업을 수행할 수 있음
- 에러 처리: 표준화된 예외 처리 메커니즘을 통해 일관된 방식으로 오류를 처리
ByteArrayOutputStream, ByteArrayInputStream
1
2
3
4
5
6
7
8
9
10
11
12
13
14
15
public class ByteArrayStreamMain {

  public static void main(String[] args) throws IOException {
    byte[] input = {1, 2, 3};

    // 메모리에 쓰기
    ByteArrayOutputStream baos = new ByteArrayOutputStream();
    baos.write(input);

    // 메모리에서 읽기
    ByteArrayInputStream bais = new ByteArrayInputStream(baos.toByteArray());
    byte[] bytes = bais.readAllBytes();
    System.out.println(Arrays.toString(bytes));
  }
}
스트림을 간단하게 테스트 하거나 스트림의 데이터를 확인하는 용도로 사용합니다.
PrintStream
1
2
3
4
5
6
7
8
9
10
public class PrintStreamMain {

  public static void main(String[] args) throws IOException {
    PrintStream printStream = System.out;

    byte[] bytes = "Hello!\n".getBytes(UTF_8);
    printStream.write(bytes);
    printStream.println("Print!");
  }
}
write(): OutputStream 부모 클래스가 제공하는 기능println(): PrintStream이 자체적으로 제공하는 추가 기능
파일 입출력
FileOutputStream, FileInputStream
1
2
3
4
5
6
7
8
9
10
11
public class CreateFileV1 {

  public static void main(String[] args) throws IOException {
    FileOutputStream fos = new FileOutputStream(FILE_NAME);

    for (int i = 0; i < FILE_SIZE; i++) {
      fos.write(1);
    }
    fos.close();
  }
}
1
2
3
4
5
6
7
8
9
10
11
12
13
public class ReadFileV1 {

  public static void main(String[] args) throws IOException {
    FileInputStream fis = new FileInputStream(FILE_NAME);

    int fileSize = 0;
    int data;
    while ((data = fis.read()) != -1) {
      fileSize++;
    }
    fis.close();
  }
}
FILE_SIZE 만큼 반복해서 데이터를 디스크에 쓰고 읽기 때문에 느립니다. 버퍼를 사용하여 이런 문제를 해결할 수 있습니다.
버퍼 활용
1
2
3
4
5
6
7
8
9
10
11
12
13
14
15
16
17
18
19
20
21
22
23
24
25
26
27
28
public class CreateFileV2 {

  public static void main(String[] args) throws IOException {
    FileOutputStream fos = new FileOutputStream(FILE_NAME);
    long startTime = System.currentTimeMillis();

    byte[] buffer = new byte[BUFFER_SIZE];
    int bufferIndex = 0;

    for (int i = 0; i < FILE_SIZE; i++) {
      buffer[bufferIndex++] = 1;

      // 버퍼가 가득 차면 쓰고, 버퍼를 비운다.
      if (bufferIndex == BUFFER_SIZE) {
        fos.write(buffer);
        bufferIndex = 0;
      }
    }

    // 끝 부분에 오면 버퍼가 가득차지 않고, 남아있을 수 있다. 버퍼에 남은 부분 쓰기
    if (bufferIndex > 0) {
      fos.write(buffer, 0, bufferIndex);
    }

    fos.close();
  }
}
1
2
3
4
5
6
7
8
9
10
11
12
13
14
public class ReadFileV2 {

  public static void main(String[] args) throws IOException {
    FileInputStream fis = new FileInputStream(FILE_NAME);

    byte[] buffer = new byte[BUFFER_SIZE];
    int fileSize = 0;
    int size;
    while ((size = fis.read(buffer)) != -1) {
      fileSize += size;
    }
    fis.close();
  }
}
BUFFER_SIZE 만큼 데이터를 버퍼 해두었다가 한 번에 쓰기 디스크 콜 횟수를 줄이기 때문에 성능적으로 빠릅니다.
디스크나 파일 시스템에서 데이터를 읽고 쓰는 단위가 보통
4KB,8KB이기 때문에BUFFER_SIZE도 그정도로만 설정해주는 것이 좋습니다.
BufferedOutputStream, BufferedInputStream
버퍼 스트림을 사용하면 위 코드를 더 간결하게 작성할 수 있습니다.
1
2
3
4
5
6
7
8
9
10
11
12
public class CreateFileV3 {

  public static void main(String[] args) throws IOException {
    FileOutputStream fos = new FileOutputStream(FILE_NAME);
    BufferedOutputStream bos = new BufferedOutputStream(fos, BUFFER_SIZE);

    for (int i = 0; i < FILE_SIZE; i++) {
      bos.write(1);
    }
    bos.close();
  }
}
1
2
3
4
5
6
7
8
9
10
11
12
13
14
public class ReadFileV3 {

  public static void main(String[] args) throws IOException {
    FileInputStream fis = new FileInputStream(FILE_NAME);
    BufferedInputStream bis = new BufferedInputStream(fis, BUFFER_SIZE);

    int fileSize = 0;
    int data;
    while ((data = bis.read()) != -1) {
      fileSize++;
    }
    bis.close();
  }
}
한 번에 쓰고/읽기
가장 빠르지만, 메모리를 한 번에 많이 사용하기 때문에 파일으 크기가 작을 때 사용해야 합니다.
1
2
3
4
5
6
7
8
9
10
11
12
13
14
public class CreateFileV4 {

  public static void main(String[] args) throws IOException {
    FileOutputStream fos = new FileOutputStream(FILE_NAME);

    byte[] buffer = new byte[FILE_SIZE];
    for (int i = 0; i < FILE_SIZE; i++) {
      buffer[i] = 1;
    }
    fos.write(buffer);
    fos.close();
  }
}
1
2
3
4
5
6
7
8
9
10
public class ReadFileV4 {

  public static void main(String[] args) throws IOException {
    FileInputStream fis = new FileInputStream(FILE_NAME);

    byte[] bytes = fis.readAllBytes();
    fis.close();
  }
}
flush()를 실행 하면 버퍼를 비우며 데이터를 씁니다.close()메서드는 종료 전flush()를 호출합니다.
문자 다루기
스트림의 모든 데이터는 byte 단위를 사용하기 때문에 문자열을 저장할 때도 byte로 변환하여 저장해야 합니다. 이 과정을 편하게 해주는 클래스가 Reader, Writer 입니다.
Reader, Writer

OutputStreamWriter, InputStreamReader
1
2
3
4
5
6
7
8
9
10
11
12
13
14
15
16
17
18
19
20
21
22
23
24
25
public class ReaderWriterMainV2 {

  public static void main(String[] args) throws IOException {
    String writeString = "abc";

    // 파일에 쓰기
    FileOutputStream fos = new FileOutputStream(FILE_NAME);
    OutputStreamWriter osw = new OutputStreamWriter(fos, UTF_8);

    osw.write(writeString);
    osw.close();

    // 파일에서 읽기
    FileInputStream fis = new FileInputStream(FILE_NAME);
    InputStreamReader isr = new InputStreamReader(fis, UTF_8);

    StringBuilder content = new StringBuilder();
    int ch;
    while ((ch = isr.read()) != -1) {
      content.append((char) ch);
    }
    isr.close();
  }
}
FileWriter, FileReader
1
2
3
4
5
6
7
8
9
10
11
12
13
14
15
16
17
18
19
20
public class ReaderWriterMainV3 {

  public static void main(String[] args) throws IOException {
    String writeString = "ABC";

    // 파일에 쓰기
    FileWriter fw = new FileWriter(FILE_NAME, UTF_8);
    fw.write(writeString);
    fw.close();

    // 파일에서 읽기
    StringBuilder content = new StringBuilder();
    FileReader fr = new FileReader(FILE_NAME, UTF_8);
    int ch;
    while ((ch = fr.read()) != -1) {
      content.append((char) ch);
    }
    fr.close();
  }
}
1
2
3
4
5
6
7
8
9
10
11
12
13
// 파일 쓰기
FileOutputStream fos = new FileOutputStream(FILE_NAME);
OutputStreamWriter osw = new OutputStreamWriter(fos, UTF_8);

// 간편하게 한줄로 작성
FileWriter fw = new FileWriter(FILE_NAME, UTF_8);

// 파일 읽기
FileInputStream fis = new FileInputStream(FILE_NAME);
InputStreamReader isr = new InputStreamReader(fis, UTF_8);

// 간편하게 한줄로 작성
FileReader fr = new FileReader(FILE_NAME, UTF_8);
BufferedReader, BufferedWriter
1
2
3
4
5
6
7
8
9
10
11
12
13
14
15
16
17
18
19
20
21
22
23
24
25
26
27
public class ReaderWriterMainV4 {

  private static final int BUFFER_SIZE = 8192;

  public static void main(String[] args) throws IOException {
    String writeString = "ABC\n가나다";

    // 파일에 쓰기
    FileWriter fw = new FileWriter(FILE_NAME, UTF_8);
    BufferedWriter bw = new BufferedWriter(fw, BUFFER_SIZE);
    bw.write(writeString);
    bw.close();

    // 파일에서 읽기
    StringBuilder content = new StringBuilder();
    FileReader fr = new FileReader(FILE_NAME, UTF_8);
    BufferedReader br = new BufferedReader(fr, BUFFER_SIZE);

    String line;
    while ((line = br.readLine()) != null) {
      content.append(line).append("\n");
    }
    br.close();

  }
}
추가로 한 줄 단위로 문자를 읽는 readLine() 기능을 제공합니다.
기타 스트림
DataOutputStream
데이터 형을 편리하게 다룰 수 있도록 하는 스트림입니다.
1
2
3
4
5
6
7
8
9
10
11
12
13
14
15
16
17
18
19
20
21
22
23
24
public class DataStreamEtcMain {

  public static void main(String[] args) throws IOException {

    // 쓰기
    FileOutputStream fos = new FileOutputStream("temp/data.dat");
    DataOutputStream dos = new DataOutputStream(fos);

    dos.writeUTF("회원A");
    dos.writeInt(20);
    dos.writeDouble(10.5);
    dos.writeBoolean(true);
    dos.close();

    // 읽기
    FileInputStream fis = new FileInputStream("temp/data.dat");
    DataInputStream dis = new DataInputStream(fis);
    System.out.println(dis.readUTF());
    System.out.println(dis.readInt());
    System.out.println(dis.readDouble());
    System.out.println(dis.readBoolean());
    dis.close();
  }
}
반드시 쓴 순서대로 읽어야 합니다.
ObjectStream
객체 자체를 읽기/쓰기 가능하도록 하는 스트림입니다.
이 스트림을 사용하기 위해서는 해당 객체에 Serializable를 implements 해야 합니다.
1
2
3
4
5
6
7
8
9
10
11
12
13
14
15
16
17
18
19
20
21
22
23
24
25
26
27
28
29
30
31
32
33
34
35
36
37
38
39
40
public class Member implements Serializable {
  private String id;
  private String name;
  private Integer age;

  public Member() {
  }

  public Member(String id, String name, Integer age) {
    this.id = id;
    this.name = name;
    this.age = age;
  }

  public String getId() {
    return id;
  }

  public void setId(String id) {
    this.id = id;
  }

  public String getName() {
    return name;
  }

  public void setName(String name) {
    this.name = name;
  }

  public Integer getAge() {
    return age;
  }

  public void setAge(Integer age) {
    this.age = age;
  }

}
1
2
3
4
5
6
7
8
9
10
11
12
13
14
15
16
17
18
19
20
21
22
23
24
25
26
public class ObjectMemberRepository {

  private static final String FILE_PATH = "temp/members-obj.dat";

  public void add(Member member) {
    List<Member> members = findAll();
    members.add(member);

    try (ObjectOutputStream oos = new ObjectOutputStream(new FileOutputStream(FILE_PATH))) {
      oos.writeObject(members);
    } catch (IOException e) {
      throw new RuntimeException(e);
    }
  }

  public List<Member> findAll() {
    try (ObjectInputStream ois = new ObjectInputStream(new FileInputStream(FILE_PATH))) {
      Object findObject = ois.readObject();
      return (List<Member>) findObject;
    } catch (FileNotFoundException e) {
      return new ArrayList<>();
    } catch (IOException | ClassNotFoundException e) {
      throw new RuntimeException(e);
    }
  }
}
객체 직렬화의 한계
- 버전 관리의 어려움: 클래스 구조가 변경되면 이전에 직렬화된 객체와의 호환성 문제 발생
- 플랫폼 종속성: 자바 질격화는 자바 플랫폼에 종속적
- 성능 이슈: 직렬화/역직렬화 과정이 상대적으로 느리고 리소스를 많이 사용
- 유연성 부족: 직렬화된 형식을 커스터마이즈하기 어려움
- 크기 효율성: 직렬화된 데이터의 크기가 상대적으로 큼
위 와 같은 이유로 잘 사용되지 않습니다.
대안으로 JSON을 사용하면 됩니다.
FIle, Files
파일 또는 디렉토리를 다룰 때 사용하는 클래스입니다.
File은 호환성 때문에 남겨둔 것이므로Files를 사용하면 됩니다.
Files 주요 메서드
1
2
3
4
5
6
7
8
9
10
11
12
13
14
15
16
17
18
19
20
21
22
23
24
25
26
27
28
29
30
31
32
33
34
35
36
37
38
39
40
41
42
43
44
45
46
47
48
49
50
51
52
53
54
55
56
57
58
59
public class NewFilesMain {

  public static void main(String[] args) throws IOException {
    Path file = Path.of("temp/example.txt");
    Path directory = Path.of("temp/exampleDir");

    // 1. exists(): 파일이나 디렉토리의 존재 여부를 확인
    System.out.println("File exists: " + Files.exists(file));

    // 2. createFile(): 새 파일을 생성
    try {
      Files.createFile(file);
      System.out.println("File created");
    } catch (FileAlreadyExistsException e) {
      System.out.println(file + " File already exists");
    }

    // 3. createDirectory(): 새 디렉토리를 생성
    try {
      Files.createDirectory(directory);
      System.out.println("Directory created");
    } catch (FileAlreadyExistsException e) {
      System.out.println(directory + " Directory already exists");
    }

    // 4. delete(): 파일이나 디렉토리를 삭제
    //Files.delete(file);
    //System.out.println("File deleted");

    // 5. isRegularFile(): 일반 파일인지 확인
    System.out.println("Is regular file: " + Files.isRegularFile(file));

    // 6. isDirectory(): 디렉토리인지 확인
    System.out.println("Is directory: " + Files.isDirectory(directory));

    // 7. getFileName(): 파일이나 디렉토리의 이름을 반환
    System.out.println("File name: " + file.getFileName());

    // 8. size(): 파일의 크기를 바이트 단위로 반환
    System.out.println("File size: " + Files.size(file) + " bytes");

    // 9. move(): 파일의 이름을 변경하거나 이동
    Path newFile = Paths.get("temp/newExample.txt");
    Files.move(file, newFile, StandardCopyOption.REPLACE_EXISTING);
    System.out.println("File moved/renamed");

    // 10. getLastModifiedTime(): 마지막으로 수정된 시간을 반환
    System.out.println("Last modified: " + Files.getLastModifiedTime(newFile));

    // 추가: readAttributes(): 파일의 기본 속성들을 한 번에 읽기
    BasicFileAttributes attrs = Files.readAttributes(newFile, BasicFileAttributes.class);
    System.out.println("===== Attributes =====");
    System.out.println("Creation time: " + attrs.creationTime());
    System.out.println("Is directory: " + attrs.isDirectory());
    System.out.println("Is regular file: " + attrs.isRegularFile());
    System.out.println("Is symbolic link: " + attrs.isSymbolicLink());
    System.out.println("Size: " + attrs.size());
  }
}
경로 표시
- 절대 경로: 처음부터 내가 입력한 모든 경로
- 정규 경로: 경로의 계산이 모두 끝난 경로
1
2
3
4
5
6
7
8
9
10
11
12
13
14
15
16
17
18
19
20
21
public class NewFilesPath {

  public static void main(String[] args) throws IOException {
    Path path = Path.of("temp/..");

    // 절대 경로
    System.out.println("Absolute path = " + path.toAbsolutePath());

    // 정규 경로
    System.out.println("Canonical path = " + path.toRealPath());

    Stream<Path> pathStream = Files.list(path);
    List<Path> list = pathStream.toList();
    pathStream.close();

    for (Path p : list) {
      System.out.println((Files.isRegularFile(p) ? "F" : "D") + " | " + p.getFileName());
    }
  }
}
문자 파일 읽기/쓰기
Files를 사용하면 FileReader, FileWriter 없이 편리하게 문자를 파일에서 읽기/쓰기가 가능합니다.
1
2
3
4
5
6
7
8
9
10
11
12
13
14
15
16
17
18
19
20
21
22
23
24
public class ReadTextFileV1 {

  private static final String PATH = "temp/hello2.txt";

  public static void main(String[] args) throws IOException {
    String writeString = "abc\n가

    Path path = Path.of(PATH);

    // 파일에 쓰기
    Files.writeString(path, writeString, UTF_8);

    // 파일에서 읽기
    String readString = Files.readString(path, UTF_8);

    // 파일에서 전체 라인 읽기
    List<String> lines = Files.readAllLines(path, UTF_8);

    // 파일에서 전체 라인 읽기 (한 줄씩)
    try (Stream<String> lineStream = Files.lines(path, UTF_8)) {
      lineStream.forEach(line -> System.out.println(line));
    }
  }
}
readAllLine() vs lines()
readAllLines(): 파일을 한 번에 다 읽고, 라인 단위로 List에 나눠 저장lines(): 파일을 한 줄 단위로 나누어 읽고, 메모리 사용량을 줄이고 싶을 때 사용
파일 복사
운영체제의 파일 복사 기능을 사용하므로 자바를 거치지 않아 매우 빠른 성능을 보여줍니다.
1
2
3
4
5
6
7
8
public class FileCopyMainV3 {

  public static void main(String[] args) throws IOException {
    Path source = Path.of("temp/copy.dat");
    Path target = Path.of("temp/copy_new.dat");
    Files.copy(source, target, StandardCopyOption.REPLACE_EXISTING);
  }
}